


 With the uncertainty surrounding recent months, I have found myself home much more than I am used to. At first, I didn’t know how to fill up all the extra time. You see, even as a homeschool family, we still spent much of the week out of the house. Between extracurricular activities, homeschool co-op, church, learning activities and appointments for four kids for different things, we were always on the go. So when we first started our “new normal” it felt very foreign. It didn’t help that we were just starting our summer break and already had a chunk of free time to fill.
I am not a person that does well with a bunch of extra free time on my hands.
Too much free time gives me too much time to think, to worry, and to stress. It’s something in my brain, I swear. Give this girl a little free time and instead of relaxing and enjoying it, I find a way to completely freak out. Everything can be going great in life, but if you give me too much free time in my day, I will absolutely remember that one time I had a wreck and what if I would have done this or that differently, where would I be today, what would be different? You get the point. It’s not a good look for me.
In the beginning of being home so much more than usual I found myself needing to fill my time, not just to keep me busy, but to keep my sanity.
One day, I was talking to my mom about the furniture in my living room and how it didn’t match. We have collected some furniture during our marriage and while I love some of it, I have hated some of it. Some of the pieces we bought out of necessity, not looks. So they definitely needed a face lift. I had two end tables that were made of cheap material and didn’t match anything in the living room. I decided these would be my test subjects for a project. So I went to my favorite place: Amazon. I had done some research and found a paint that people raved about so I decided to try to bring these tables back to life with some chalk paint and wax.


I ended up buying this paint, this wax, and this set of wax brushes. I was clueless on what I was doing, but I love a good challenge, so I dove in head-first. I took the tables and sanded them. I just needed to get the gloss layer off. Many people say sanding isn’t necessary, but I wanted to be safe which on these tables wasn’t hard to do. I had an old paint brush, so I used it for the chalk paint. Painting with the chalk paint was easy. It was smooth going on and left an even coat. Once I painted the first coat on each table, I then let them dry for an hour. After an hour, I painted a second coat. Although the paint is thick, I found that a second coat helped make the finish even all over. Once I finished painting the second coat on both tables, I impatiently waited four hours before I was able to start the wax process.
The wax process was much easier than I anticipated, but there are a few things I have changed as I have learned, which means you get to learn from my mistakes. First, the color of wax you choose and the look you are going for will determine what steps you do next. With my first project, I chose a white wax with gray paint; although I loved the outcome, it was not quite the look I was going for. After more research, I figured out where I went wrong. When using chalk paint as a base, I didn’t take into account that the paint would soak up everything that touched it like a sponge. So, instead of a grainy look, I ended up with a more whitewashed look (which I really love, but it was an accident). To be able to control the way the wax looks, I have started using a clear wax first using a cloth to apply followed by a colored wax using a wax brush to apply then wiping away until I get the desired look. In the pictures you can see the difference in how I applied the wax and determine which look you prefer!


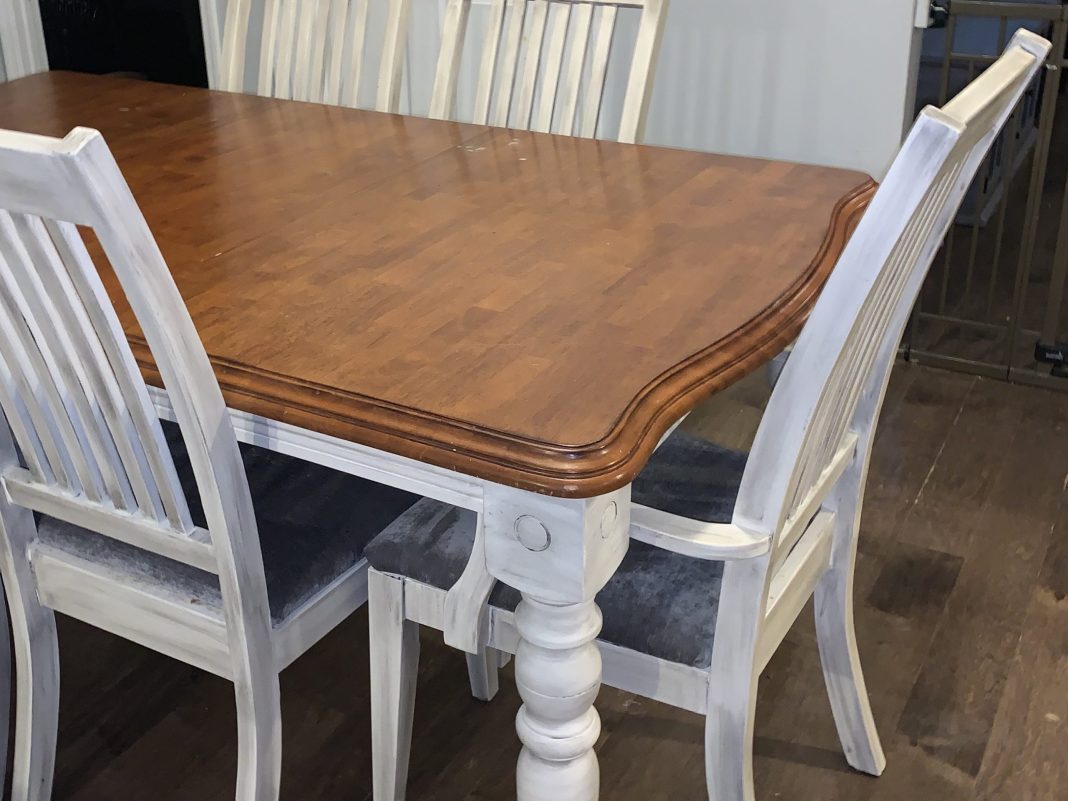
This one project led to multiple projects and now my house looks like we bought new furniture. My favorite redo so far has been my kitchen table and chairs. The outcome was amazing and exactly what I wanted to buy, but so much cheaper.


